Network Testing
Usually vagga runs processes in host network namespace. But there is a mode for network testing.
Warning
This documentation is awfully incomplete. There is a good article
in the meantime. Except vagga_network command is replaced by
vagga _network subcommand (note the space after vagga)
Overview
For testing complex networks we leverage !Supervise type of commands to
run multiple nodes. But we also need a way to setup network. What we need in
particular:
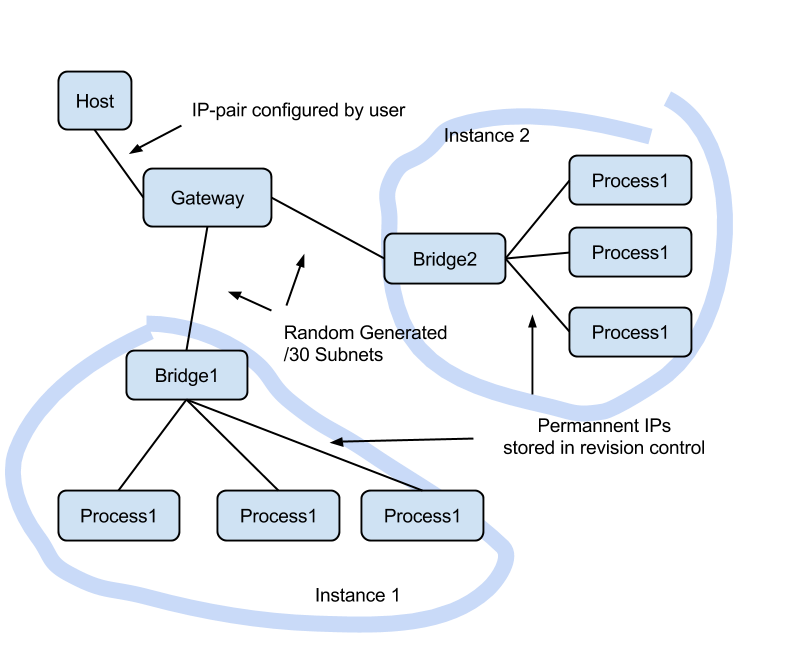
- The IPs should be hard-coded (i.e. checked in into version control)
- Multiple different projects running simultaneously (and multiple instances of same project as a special case of it)
- Containers should be able to access internet if needed
So we use “double-bridging” to get this working, as illustrated below:
The Setup section describes how to setup a gateway in
the host system, and Containers section describes how
to configure containers in vagga.yaml. And
Partitioning section describes how to implement tests
which break network and create network partitions of various kinds.
Setup
Unfortunately we can’t setup network in fully non-privileged way. So you need to do some preliminary setup. To setup a bridge run:
$ vagga _create_netns
Running this will show what commands are going to run:
We will run network setup commands with sudo.
You may need to enter your password.

The following commands will be run:
    sudo 'ip' 'link' 'add' 'vagga_guest' 'type' 'veth' 'peer' 'name' 'vagga'
    sudo 'ip' 'link' 'set' 'vagga_guest' 'netns' '16508'
    sudo 'ip' 'addr' 'add' '172.23.255.1/30' 'dev' 'vagga'
    sudo 'sysctl' 'net.ipv4.conf.vagga.route_localnet=1'
    sudo 'mount' '--bind' '/proc/16508/ns/net' '/run/user/1000/vagga/netns'
    sudo 'mount' '--bind' '/proc/16508/ns/user' '/run/user/1000/vagga/userns'

The following iptables rules will be established:
    ["-I", "INPUT", "-i", "vagga", "-d", "127.0.0.1", "-j", "ACCEPT"]
    ["-t", "nat", "-I", "PREROUTING", "-p", "tcp", "-i", "vagga", "-d", "172.23.255.1", "--dport", "53", "-j", "DNAT", "--to-destination", "127.0.0.1"]
    ["-t", "nat", "-I", "PREROUTING", "-p", "udp", "-i", "vagga", "-d", "172.23.255.1", "--dport", "53", "-j", "DNAT", "--to-destination", "127.0.0.1"]
    ["-t", "nat", "-A", "POSTROUTING", "-s", "172.23.255.0/30", "-j", "MASQUERADE"]
Then immediatelly the commands are run, this will probably request your
password by sudo command. The iptables commands may depend on DNS server
settings in your resolv.conf.
Note
you can’t just copy these commands and run (or push exact these
commands to /etc/sudoers), merely because the pid of the process in
mount commands is different each time.
You may see the commands that will be run without running them with
--dry-run option:
$ vagga _create_netns --dry-run
To destroy the created network you can run:
$ vagga _destroy_netns
This uses sudo too
Warning
if you have 172.23.0.0/16 network attached to your machine,
the _create_netns and _destroy_netns may break that network. We will
allow to customize the network in future versions of vagga.
Containers
Here is a quick example of how to run network tests: vagga.yaml
The configuration runs flask application with nginx and periodically stops network between processes. For example here is test for normal connection:
$ vagga run-normal &
$ vagga wrk http://172.23.255.2:8000 --latency
Running 10s test @ http://172.23.255.2:8000
  2 threads and 10 connections
  Thread Stats   Avg      Stdev     Max   +/- Stdev
    Latency     6.07ms    1.05ms  20.21ms   94.69%
    Req/Sec   827.65     78.83     0.92k    86.00%
  Latency Distribution
     50%    5.82ms
     75%    6.11ms
     90%    6.54ms
     99%   11.62ms
  16485 requests in 10.00s, 2.86MB read
Requests/sec:   1647.73
Transfer/sec:    292.78KB
Here is the same test with bad network connection:
$ vagga run-flaky &
$ vagga wrk http://172.23.255.2:8000 --latency
Running 10s test @ http://172.23.255.2:8000
  2 threads and 10 connections
  Thread Stats   Avg      Stdev     Max   +/- Stdev
    Latency   241.69ms  407.98ms   1.41s    81.67%
    Req/Sec   631.83    299.12     1.14k    71.05%
  Latency Distribution
     50%    7.27ms
     75%  355.09ms
     90%  991.64ms
     99%    1.37s
  5032 requests in 10.01s, 0.87MB read
Requests/sec:    502.64
Transfer/sec:     89.32KB
The run-flaky works as follows:
- Stop networking packets going between nginx and flask
(
iptables .. -j DROP) - Sleep for a second
- Restore network
- Sleep for a second
- Repeat
The respective part of the configuration looks like:
interrupt: !BridgeCommand
  container: test
  run: |
    set -x
    while true; do
      vagga _network isolate flask
      sleep 1
      vagga _network fullmesh
      sleep 1
    done
As you can see in the test there are interesting differences:
- average latency is 241ms vs 5ms
- median latency is about the same
- 99 percentile of latency is 1.37s vs 11.62ms (i.e. 100x bigger)
- request rate 502 vs 1647
The absolute scale doesn’t matter. But intuitively we could think that if network doesn’t work 50% of the time it should be 3x slower. But it isn’t. Different metrics are influenced in very different way.